


How to Fillet a Fish Step by Step Tools Techniques and Safety Tips

A clean fish fillet starts long before the first cut. The right knife, a steady cutting board, and a calm pace make the difference between ragged pieces of meat and smooth fillets you will be proud to cook.
Filleting can feel intimidating at first because fish are slippery, bones are hidden, and every species has a slightly different shape. The good news is that the basic method stays the same: secure the fish, follow the backbone, let the knife do the work, and trim with care. Once that motion clicks, the process becomes faster, cleaner, and much less wasteful.
This guide walks through the tools, the core steps, techniques for different fish, and the safety habits that make the job easier.

Set up your station before you make the first cut
Good filleting is part knife skill and part setup. A messy, slippery workspace makes the fish harder to control and raises the chance of a cut.
Start with a stable cutting board. A large plastic board is easy to clean and gives you room to move. If the board slides, place a damp towel or non-slip mat underneath it. The board should be bigger than the fish, so the tail and head are not hanging off the edge.
The most important tool is a sharp fillet knife. A dull knife forces you to press harder, which makes the blade more likely to slip. A flexible fillet knife works well for most fish because it bends along the rib cage and skin. For larger fish, a slightly stiffer boning knife can help when cutting through thicker sections near the head.
Keep these tools nearby:
Fillet knife
Thin, sharp, and flexible enough to follow the bones.
Cutting board
Large, stable, and easy to sanitize.
Fish scaler or back of a knife
Useful if the fish still has scales and you plan to keep the skin on.
Kitchen towel or paper towels
Helps grip the fish and wipe moisture from the board.
Fish tweezers or needle-nose pliers
Best for removing pin bones.
Bowl for trimmings
Keeps bones, skin, and scraps contained.
Small bowl of cold water
Useful for rinsing hands, but avoid soaking the fillets.
Trash bag or compost container
Fish scraps smell quickly, so keep cleanup simple.
If the fish has not been gutted, do that first. Make a shallow cut along the belly from the vent toward the head, remove the organs, and rinse the cavity with cold water. Pat the fish dry before filleting. Dry fish are safer to handle than wet, slippery fish.
Sharp knives are safer than dull knives because they cut where you guide them. Dull knives need force, and force causes slips.
Follow the basic step by step filleting method
The shape of the fish changes the details, but this basic method works for most round fish, such as bass, snapper, walleye, trout, cod, and smaller salmon.
Start with a clean, dry fish
Place the fish on its side with the belly facing you and the head to your non-dominant hand. Pat both sides dry. If the fish is very slick, hold it with a towel near the head.
Make sure the belly cavity is empty and clean. If scales are still on and you plan to cook the fillet skin-on, scale the fish first. Work from tail to head with a scaler or the dull back of a knife. Rinse briefly, then dry again.
Make the first cut behind the gill plate
Angle the knife behind the pectoral fin and gill plate. Cut down until the blade reaches the backbone. Do not saw through the spine. This first cut opens the path for the fillet.
Keep the tip of the knife controlled. Use short, smooth strokes. The knife should glide rather than chop.
Turn the blade and follow the backbone
Once the knife reaches the backbone, turn the blade so it points toward the tail. Keep the flat side of the blade close to the bones.
Use your free hand to lift the meat gently as you cut. This helps you see where the blade is going. Work from head to tail in long, shallow strokes. Listen for the light clicking sound as the knife moves along the rib bones. That sound means you are staying close.
Do not rush this part. The goal is to separate the fillet without leaving good meat on the frame.
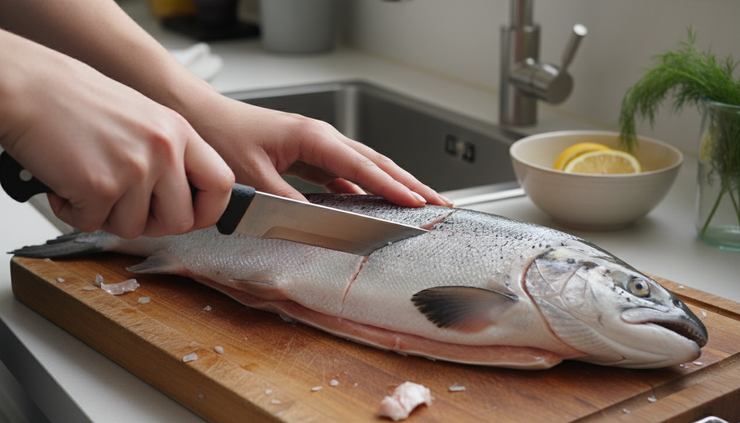
Free the fillet from the rib cage
When the top of the fillet is loose, lift it slightly and slide the knife over the rib cage. Keep the blade angled downward toward the bones. This curve is where flexibility helps.
Some cooks cut through the rib bones and remove them later. For beginners, it is usually easier and cleaner to ride over the ribs and leave them attached to the fish frame.
Continue cutting until the fillet is attached only near the belly or skin at the tail. Finish the cut and set the fillet aside.
Repeat on the second side
Flip the fish over and repeat the same process. The second side can feel awkward because the fish is no longer flat. Go slower and keep your cuts shallow. A towel under the frame can help steady it.
Remove pin bones
Run your fingers lightly over the fillet from head end to tail. Pin bones feel like tiny stiff points. Pull them out with fish tweezers in the same direction they run. Pulling with the grain keeps the flesh from tearing.
Some fish have more pin bones than others. Salmon and trout often need extra attention. Small panfish may have fine bones that are easier to avoid with careful trimming.
Skin the fillet if needed
Place the fillet skin-side down with the tail end closest to you. Cut a small tab of flesh at the tail end, just enough to grip. Hold the skin firmly with a towel.
Set the knife almost flat between the skin and flesh. Use a gentle sawing motion while pulling the skin back toward you. Keep the blade angled slightly down toward the skin so you do not shave off too much meat.
If the skin is edible and the fish has been scaled, you can leave it on. Crispy fish skin is delicious on species like trout, salmon, snapper, and striped bass.
Trim and portion the fillets
Trim away fins, belly membrane, bloodline, bruised areas, and stray bones. Cut the fillet into portions that cook evenly. Thick center cuts may need more time than thin tail pieces, so separating them can help.
At this point, the fillets should look clean, smell fresh, and feel firm. Pat them dry before cooking or storing.
Adjust your technique for different types of fish
The best filleting technique depends on the fish’s body shape, bone structure, and texture. Once you understand those differences, you waste less and get better-looking portions.
Round fish need backbone control
Round fish have a classic fish shape, with one fillet on each side. Bass, snapper, cod, walleye, trout, and many saltwater fish fall into this group.
For these fish, the backbone is your main guide. Keep the blade close to it, then work over the ribs. Long, smooth strokes give cleaner results than short chopping motions.
For small round fish, a flexible knife is ideal. For large round fish, such as big cod or salmon, use a longer blade so each stroke covers more distance.
Flatfish need four fillets instead of two
Flatfish, such as flounder, sole, and halibut, are shaped differently. They usually provide four fillets: two from the top side and two from the bottom.
Place the fish dark-side up. Find the center line running from head to tail. Cut along that line down to the bones. Then work the knife outward toward the fins, using the bones as a flat guide.
Repeat on the other half of the same side, then flip the fish and do the bottom. Flatfish reward patience. The fillets are thin, so shallow cuts matter.
Salmon and trout need attention to pin bones
Salmon and trout have tender flesh and noticeable pin bones. Use a sharp knife and avoid pressing hard. Crushing the flesh can make the fillet look rough.
With salmon, many people remove the fillet from the frame, then carefully trim the rib bones and pull the pin bones. Skin-on salmon portions are popular because the skin helps hold the fish together during cooking.
Trout can be filleted like other round fish, but small trout are often butterflied. To butterfly a fish, remove the backbone while keeping both fillets attached at the belly. This works well for pan-frying whole or stuffing with herbs.
Panfish call for smaller cuts
Bluegill, crappie, perch, and other panfish are small, so every bit of meat counts. Use a smaller fillet knife and make precise cuts behind the head and along the backbone.
Because the fillets are thin, avoid over-trimming. Many cooks skin panfish fillets because their scales are firm and the skin can curl in a hot pan.
Oily and delicate fish need a light touch
Mackerel, sardines, and other oily fish have soft flesh. Keep them cold until the last moment, use a very sharp knife, and handle the fillets as little as possible.
Delicate white fish, such as sole, can tear if lifted too high while cutting. Let the knife do most of the work and support the fillet with your fingers as it comes free.

Stay safe and avoid wasting good fish
Filleting fish is not dangerous when you slow down and respect the blade. Most accidents happen when people rush, force a dull knife, or let the fish slide.
Keep these safety habits in mind:
Cut away from your body
Angle the blade so a slip does not travel toward your hand or torso.
Keep your free hand behind the blade
Use a towel to grip the fish instead of placing fingers in the knife path.
Dry the board often
Moisture makes everything slippery. Wipe the board between fish.
Sharpen before you start
A clean edge needs less pressure and gives better control.
Take breaks
Tired hands make clumsy cuts, especially when cleaning several fish.
Food safety matters too. Keep fish cold before and after filleting. If you are cleaning fish outdoors, use a cooler with ice and work in the shade when possible. Wash knives, boards, and hands with hot soapy water after handling raw fish. Sanitize the cutting board after cleanup, especially if it will be used for vegetables or ready-to-eat food.
Avoiding waste starts with knife angle. Keep the blade against the bones, not up in the meat. Lift the fillet gently so you can see the line where flesh meets frame. If you notice thick strips of meat left on the skeleton, slow down on the next fish and use shallower strokes.
Do not throw away useful parts too quickly. Fish frames, heads, collars, and skin can be valuable if handled well.
Good uses for trimmings include:
Fish stock
Use clean frames from mild fish for soups, chowders, risotto, or sauces.
Fish collars
The collar area near the head is rich and flavorful, especially on salmon, yellowtail, and striped bass.
Crispy skin
Scaled skin can be pan-seared until crisp.
Scrap meat
Small clean pieces can go into fish cakes, tacos, fried rice, or chowder.
Discard gills, guts, and any parts that smell sour or look questionable. Fresh fish should smell clean, briny, or mild, not sharp or rotten.
Practice until the cuts feel natural
No one makes perfect fillets on the first try. Early attempts may have uneven edges, missed bones, or extra meat left on the frame. That is normal. Each fish teaches your hands where the bones are.
Start with a fish that is easy to handle. Medium-size round fish are often good for practice because the bones are clear and the fillets are not too fragile. Very tiny fish can be frustrating. Very large fish can require more strength and a bigger knife.
After each fish, look at the frame. This is one of the best learning tools. If the skeleton is clean, your angle was good. If meat remains along the backbone, you lifted the blade too far away from the bones. If the fillet has deep cuts, you pressed too hard or changed direction too often.
A simple practice routine helps:
Set up the same way every time
Consistency builds muscle memory.
Make the first cut slowly
A clean start makes the rest easier.
Use the bones as your guide
Feel the knife ride along the structure of the fish.
Check for bones before cooking
Run your fingers over every fillet.
Review the frame
Learn from what is left behind.
If you fish often, take notes on species that give you trouble. A flounder, a trout, and a bass all ask for slightly different movements. Over time, those differences become familiar.

Bring it all together at the cutting board
Learning to fillet a fish is really learning to slow down and pay attention. Use a sharp fillet knife, keep the fish dry and steady, follow the backbone, trim with care, and treat every species according to its shape.
The reward is more than a clean fillet. You get better portions, safer prep, less waste, and a stronger connection to the food you cook.
Practice on one fish at a time. Notice what worked, what felt awkward, and where the bones changed direction. Then share your results, questions, and hard-earned tips with other cooks or anglers. The more people compare notes, the better everyone gets at turning a whole fish into a meal worth remembering.



Comments